
Popular Articles
Midnight Purple Paint for GTR R34
2026.01.13
Exploring the Allure of Midnight Purple
2026.01.13
Benefits of Using Carbon Fiber Vinyl Wraps
2026.01.13
About Company
Colorfuul is a global leader in high-end automotive films, offering Color TPU PPF, Transparent PPF, PET Window Films, and Vinyl Wrapping. With exports to over 100 countries, we deliver consistent quality, competitive pricing, and professional service. Beyond production, we provide OEM/ODM customization, shaping the future of automotive aesthetics.
 mary@colorfuul.com
  86 13541196952
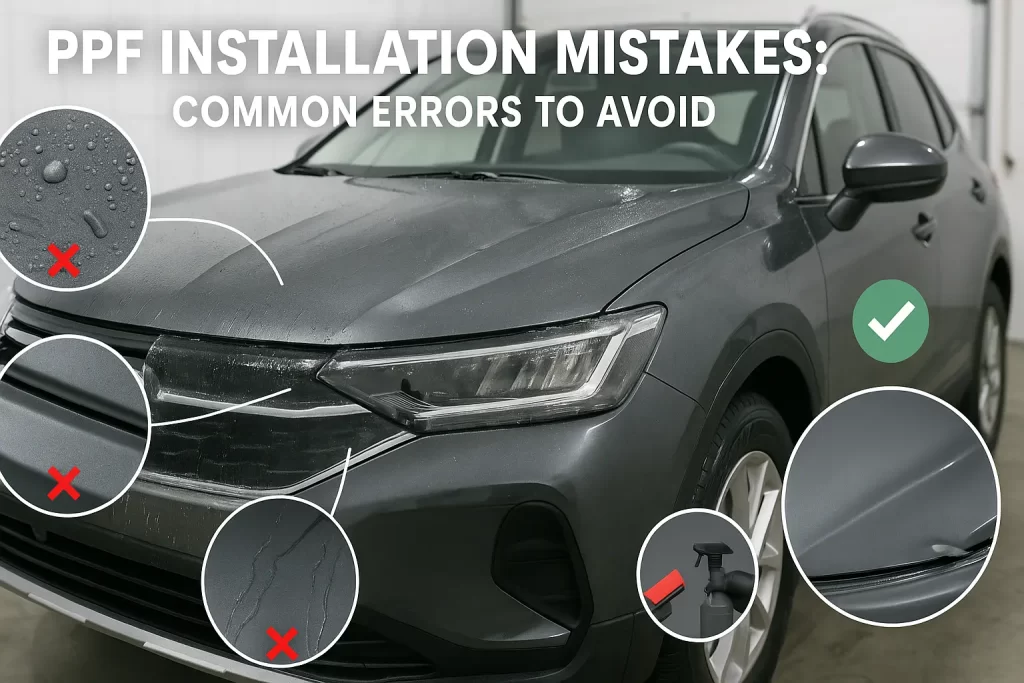
 PPF Installation Mistakes: Common Errors to Avoid
Avoiding PPF installation mistakes is the absolute key to achieving a flawless, durable, and long-lasting result. The process of applying paint protection film is one of extreme precision. A tiny error at any stage, from the initial preparation to the final squeegee stroke, can lead to a visible and often permanent flaw. These mistakes are what separate a high-end, professional installation from a disappointing amateur attempt. This guide will provide a deep dive into the most common errors made during a PPF installation. By understanding these pitfalls, a vehicle owner can learn to recognize high-quality workmanship and appreciate the immense skill required for this craft.
The Foundational Error: Inadequate Surface Preparation
The vast majority of PPF installation failures can be traced back to one single source: improper surface preparation. The film is a transparent lens that magnifies the condition of the surface it is applied to. Any flaw or contaminant left on the paint will be locked in forever. A professional installer spends a significant portion of their time, often 50% or more of the entire project, on preparation. Rushing or skipping steps in this foundational phase is the single biggest mistake anyone can make.
Mistake: Not Performing a Full Decontamination
A common error is believing that a simple car wash is enough to clean the vehicle. This is completely false. A standard wash only removes loose dirt and dust. It does nothing to address the bonded contaminants that are stuck to the clear coat. An amateur may skip the chemical and mechanical decontamination steps, leaving the paint feeling rough to the touch. This is a critical oversight.
Consequence: Trapped Contaminants and Poor Adhesion
If the film is applied over a surface that has not been fully decontaminated, two major problems will occur. First, any remaining bonded contaminants, like iron fallout or tree sap, will create tiny raised bumps under the film. These will be highly visible and will ruin the smooth finish. Second, these contaminants will interfere with the adhesive's ability to form a proper bond with the clear coat. This can lead to poor adhesion, air pockets, and areas where the film may start to lift prematurely. The entire, exhaustive process is detailed in our guide to surface prep for PPF.
Mistake: Skipping Paint Correction
Another foundational error is applying PPF to unpolished paint. Many people, especially with a brand-new car, assume the paint is perfect and does not need polishing. This is almost never true. Nearly all new cars have fine swirl marks and light scratches from the dealership's improper washing. An inexperienced installer or a DIY enthusiast may not have the skill or tools to perform a proper paint correction.
Consequence: Magnifying Swirls and Scratches Under the Film
Applying a high-gloss PPF over swirled paint is like putting a magnifying glass on the problem. The film's clarity and depth will actually make the swirl marks underneath look more severe and noticeable. The opportunity to create a truly flawless, mirror-like finish is lost. The vehicle will be protected, but it will never look its absolute best. A true professional knows that the paint must be perfected before it is protected.
Environmental Errors: Working in the Wrong Space
The environment where the installation takes place is a critical factor. The film acts like a magnet for any dust, lint, or debris in the air. Attempting to install PPF in an uncontrolled or dirty environment is a guaranteed recipe for a contaminated and flawed result.
Mistake: Installing in a Dusty or Dirty Garage
A typical home garage, no matter how clean it may seem, is a hostile environment for PPF installation. There is airborne dust from the concrete floor, lint from stored items, and the risk of leaves or dirt blowing in when the door is opened. An amateur who attempts the installation in such a space will be fighting a losing battle against contamination from the very start.
Consequence: Permanent Dust and Lint Under the Film
Any speck of dust or lint that lands on the wet adhesive side of the film during installation becomes a permanent part of the job. It gets trapped between the film and the paint. It will be visible as a tiny, raised dot or a small fiber under the surface. A professional installation should have virtually zero trapped debris. A typical amateur installation will have dozens or even hundreds of these small imperfections across the vehicle.
Mistake: Working in Poor Lighting
An installer can only fix what they can see. A common mistake is to work in a poorly lit area. Standard garage lighting is completely inadequate for PPF installation. It does not provide the brightness or the right angle of light to reveal fine details, small bubbles, or trapped contaminants.
Consequence: Missing Flaws and Misaligning Panels
Working in poor light means the installer will miss many imperfections. They will not be able to see the tiny dust nibs until the car is pulled out into the sunlight, by which point it is too late. Poor lighting also makes it very difficult to align the film perfectly with the edges of the panels. This can result in crooked lines and uneven gaps, ruining the professional look of the installation.
Film Handling and Application Errors
The technical process of handling and applying the film is where many mistakes are made. The film is a delicate and unforgiving material. It requires specific techniques to handle it correctly.
Mistake: Touching the Adhesive Side of the Film
The adhesive side of the PPF is extremely sensitive. A classic amateur mistake is to touch the adhesive with their fingers. The oils and residues from their skin will be transferred to the adhesive. This will create a permanent, visible fingerprint under the film that cannot be removed.
Consequence: Permanent Fingerprints Under the Film
These fingerprints are often not visible until the film has fully cured. They appear as small, hazy smudges in the finish. They are a clear sign of an inexperienced installer. A professional develops techniques to handle and position the film without ever touching the adhesive surface. They let the film rest on their knuckles or use the non-adhesive side to manipulate it.
Mistake: Using Incorrect Application Solutions
The slip and tack solutions must be mixed in the correct ratios. A common mistake is to use too much soap in the slip solution. This can make the film too slippery and difficult to squeegee out. It can also leave behind a soapy residue that can interfere with the final bond. Using too little soap will cause the film to stick too quickly, making it impossible to position correctly.
Consequence: Poor Slip, Early Tacking, or Adhesive Failure
An incorrect slip solution will make the entire installation a struggle. The film will either be uncontrollable or will stick prematurely, causing wrinkles and stretch marks. An incorrect tack solution, or using it at the wrong time, can also cause issues. These chemical imbalances can even lead to the adhesive breaking down or failing to bond properly over the long term.
The Squeegee: Errors in Technique
The squeegee is the installer's primary tool, and the proper technique is a difficult skill to master. The goal is to evacuate 100% of the slip solution from under the film. Any error in this process will result in a visible flaw.
Mistake: Applying Incorrect or Inconsistent Pressure
A beginner almost always struggles with applying the right amount of pressure with the squeegee. If the pressure is too light, it will not force all the water out. If the pressure is too heavy, it can scratch the film's top coat or stretch the material. The pressure must also be perfectly consistent across the entire length of the squeegee stroke.
Consequence: Leaving Behind Bubbles, Lift Lines, and Moisture Pockets
Inconsistent squeegee pressure is the direct cause of several major flaws. Small pockets of water that are left behind will appear as bubbles. A point where the squeegee stroke starts or stops with too much pressure can create a "lift line," which is a visible line in the adhesive. If a large area is not squeegeed properly, it can leave a large moisture pocket that will look hazy and may never fully cure. Learning how to remove bubbles from color ppf is a skill, but preventing them in the first place is the real goal.
Mistake: Using the Wrong Type of Squeegee
There are dozens of different types of squeegees. They come in different sizes, shapes, and levels of hardness (durometer). A common mistake is to try to use one or two squeegees for the entire car. An amateur may not have the right tool for a specific job, such as a small, flexible squeegee for a tight corner.
Consequence: Scratched Film or Inability to Clear Moisture
Using a squeegee that is too hard can scratch the film. Using one that is too soft will not be effective at removing the water. A professional has a huge collection of these tools and knows exactly which one to use for each specific situation. Having the right tools for ppf installation is non-negotiable.
Errors in Stretching and Heating the Film
Modern vehicles are full of complex curves. To make the flat sheet of PPF conform to these shapes, it must be stretched. This process involves a delicate balance of heat and tension. It is one of the most difficult skills to learn and a common area for major installation errors.
Mistake: Overstretching the Film on Curves
A beginner, when faced with a complex curve like a bumper, will often try to force the film into place by stretching it too much. They will pull and tug on the material until it conforms. While the film is very elastic, it has its limits. Overstretching the film is a catastrophic error.
Consequence: Color Distortion, Stretch Marks, and Premature Failure
When a color PPF is overstretched, the color in that area will become distorted and look lighter. It can also create visible "stretch marks" in the finish that look like fine lines. More importantly, an overstretched piece of film is under constant tension. The adhesive is struggling to hold it in that unnatural shape. This will almost always lead to the film pulling back from the edges and failing prematurely.
Mistake: Using Too Much or Too Little Heat
Heat is used to make the film more pliable for stretching. A common mistake is to use the heat gun improperly. Applying too much heat can easily melt or burn the film, instantly ruining the panel. Using too little heat will mean the film is not pliable enough to conform to a curve, which will lead to wrinkles or "fingers" of excess material.
Consequence: Damaged Film or Poor Adhesion on Edges
A burnt or melted spot on the film is an unfixable error. The panel must be completely redone. Using the incorrect amount of heat during the "post-heating" phase is also a problem. Post-heating is the process of applying heat to the edges of the film after it has been installed. This helps to activate the adhesive and ensure a strong, secure bond. If this is not done correctly, the edges may not be fully sealed, leading to lifting. This process of heat activation for tpu ppf is a critical finishing step.
Trimming and Edge Work Mistakes
The final appearance of the installation is largely defined by the quality of the trimming and the edge work. This is what creates the seamless, paint-like look. Errors in this final stage can ruin an otherwise acceptable installation.
Mistake: Cutting on the Vehicle's Paint
For a "bulk" installation where the film is trimmed by hand, the biggest risk is cutting the vehicle's paint. An amateur who does not have a feel for the correct knife pressure can easily cut right through the film and score the clear coat underneath. This is the cardinal sin of PPF installation.
Consequence: Permanent Knife Marks in the Clear Coat
A knife mark in the paint is permanent damage. It is an iatrogenic injury, a problem caused by the supposed cure. The only way to fix it is to have the panel professionally polished or even repainted. This is one of the main reasons why pre-cut kits are a safer option for beginners and why the skill of a professional bulk installer is so valuable.
Mistake: Leaving Exposed or Poorly Wrapped Edges
A common sign of an amateur installation is poor edge work. The film may be trimmed too short, leaving a visible gap of paint along the edge of the panel. Or, the installer may not have the skill to properly wrap the film around the edges. This leaves an exposed edge of the film that is visible and vulnerable.
Consequence: Dirt Collection and Premature Peeling
An exposed edge acts like a shelf that collects dirt and wax. Over time, a dark line will form along this edge, making the film's outline highly visible. An exposed edge is also much more likely to be caught by a pressure washer or a drying towel. This can cause the edge to lift and begin to peel back, leading to the failure of the entire panel.
The Biggest Mistake of All: A Failed DIY Attempt
When you consider this long list of potential errors, it becomes clear that the biggest mistake of all is for an amateur to attempt this project in the first place. A DIY color TPU PPF installation is not a single task; it is a minefield of a hundred potential failures.
Why a DIY Project is a Collection of These Mistakes
A DIY enthusiast, through no fault of their own, is likely to make many of the mistakes on this list. They will be working in a sub-optimal environment. The final result will inevitably be a collection of these errors: some trapped dirt, a few bubbles, a poorly wrapped edge, and a visible seam. These are all part of the steep learning curve.
The Financial Consequence of a DIY Failure
The high likelihood of failure makes a DIY attempt a huge financial gamble. The cost of the professional-grade film and the basic tools can be substantial. When a DIYer ruins several panels and has to buy more film, the cost can quickly spiral. It is very common for the final cost of a failed DIY project to be more than the original quote from a professional shop. For a look at what goes into a professional quote, see our article on color ppf installation cost. This is all before factoring in the value of the many hours of frustrating labor. For those who still want to try, it is important to know where to buy ppf kits.
Why it's Better to Hire a Professional
A professional installer provides a solution to all of these potential mistakes. They have a clean environment. They have the complete toolkit. The decision to hire a pro for color ppf is a decision to avoid all of these common mistakes and guarantee a perfect result. Their expertise covers every aspect, from a full vs partial ppf coverage to avoiding all these common installation mistakes of color ppf.
Final Thoughts on PPF Installation Mistakes
The long list of potential PPF installation mistakes serves to highlight the incredible level of skill and precision required for this craft. It is a demanding trade that combines the cleanliness of a surgeon, the patience of a saint, and the steady hand of an artist. From the multi-stage surface preparation to the final, microscopic edge tuck, every step must be executed flawlessly. The best way for a vehicle owner to avoid these common errors is to do their research and choose a reputable, experienced, and certified professional installer. This is the only path that guarantees a beautiful, durable, and mistake-free finish that will protect and enhance their vehicle for years to come.


