
Popular Articles
Midnight Purple Paint for GTR R34
2026.01.13
Exploring the Allure of Midnight Purple
2026.01.13
Benefits of Using Carbon Fiber Vinyl Wraps
2026.01.13
About Company
Colorfuul is a global leader in high-end automotive films, offering Color TPU PPF, Transparent PPF, PET Window Films, and Vinyl Wrapping. With exports to over 100 countries, we deliver consistent quality, competitive pricing, and professional service. Beyond production, we provide OEM/ODM customization, shaping the future of automotive aesthetics.
 mary@colorfuul.com
  86 13541196952
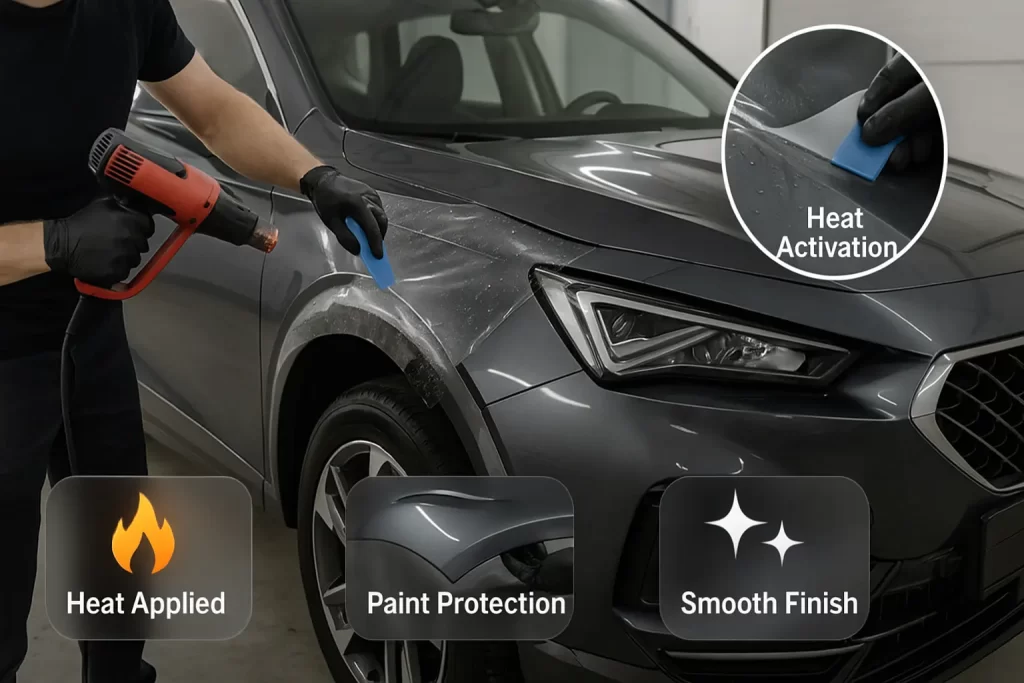
 Heat Activation for TPU PPF: The Smart Way to Install Film
The technique of heat activation for TPU PPF is a cornerstone of modern, high-quality paint protection film installation. In the hands of a skilled professional, heat is a versatile and powerful tool. It is used to make the film conform to complex curves, to seal edges for long-term durability, and even to repair minor scratches in the film’s surface. This is not a simple case of just warming up the film; it is a precise, scientific process that requires a deep understanding of the material's properties. This guide will provide an in-depth exploration of how and why heat is used in the world of TPU PPF, revealing the smart techniques that separate a professional from an amateur.
The Science of Heat and Thermoplastic Polyurethane
To understand why heat is so effective, one must first understand the nature of the film itself. Paint protection film is made from thermoplastic polyurethane (TPU). The "thermo" part of that name is the key. It means the material's properties change in response to thermal energy, or heat. This is a fundamental characteristic that installers leverage throughout the process.
Understanding Thermoplastics: The "Thermo" Part
A thermoplastic is a type of polymer that becomes soft and pliable when heated and then returns to a solid state when cooled. This process is reversible, meaning it can be repeated without chemically degrading the material. This is different from a "thermoset" plastic, which undergoes a permanent chemical change when heated and cannot be reshaped. The thermoplastic nature of TPU is what makes it possible to mold and stretch the film over the complex shapes of a vehicle.
How Heat Affects TPU at a Molecular Level
At a microscopic level, TPU is composed of long, entangled chains of polymer molecules. At room temperature, these chains are relatively locked in place, giving the film its solid, stable form. When heat is applied, this thermal energy is transferred to the molecules. This causes them to vibrate and move more freely. The bonds between the polymer chains loosen, and the material enters a more flexible, rubber-like state. This increased mobility of the polymer chains is what allows the film to be stretched and formed.
The Glass Transition Temperature (Tg) of TPU
Every polymer has a property called the glass transition temperature, or Tg. Below this temperature, the material is hard and glassy. Above this temperature, it becomes soft and rubbery. For the types of TPU used in paint protection film, this transition temperature is relatively low. This means that only a moderate amount of heat is needed to make the film significantly more pliable. An installer does not need to get the film extremely hot to make it workable.
The Difference Between Softening and Melting
It is crucial to understand the difference between the softening point (the Tg) and the melting point. Applying enough heat to raise the film above its Tg will make it easy to stretch and form. Applying too much heat, and raising the material to its full melting point, will destroy it. The film will lose its structural integrity and become a gooey mess. The art of heat activation is in applying just enough heat to make the material workable without ever approaching the point of damage. For a general overview of protective films, the Paint protection film page offers useful context.
Application 1: Using Heat for Installation and Conforming
The primary and most frequent use of heat is during the installation process itself. Modern vehicles are full of complex, three-dimensional curves. A flat sheet of PPF cannot naturally conform to these shapes. Heat is the tool that allows an installer to temporarily change the film's properties, enabling it to be molded perfectly to these challenging surfaces.
The Challenge of Compound Curves
A simple curve, like the side of a fender, can often be wrapped with little to no stretching. A compound curve, which curves in two or more directions at once, is much more difficult. Front bumpers, side mirrors, and the areas around headlights are all examples of compound curves. If you try to lay a flat piece of film over these shapes, you will end up with excess material that bunches up into wrinkles or "fingers."
The Technique of "Glassing" a Panel
To manage the film on a complex panel, an installer will often start by "glassing" it. This involves laying the large, wet piece of film over the panel and creating a single anchor point, usually in the flattest area. They will then use a gentle amount of heat and light stretching to smooth the film out across the surface. This technique pre-shapes the film to the general contour of the panel before the main squeegee work begins. It helps to manage the excess material and plan the installation strategy.
How Heat Allows for Controlled Stretching
Once the film is roughly in place, heat is used to handle the complex areas. The installer will gently warm an area with their heat gun. This makes the film soft and elastic. They can then apply gentle, even pressure to stretch the film over a curve or into a recess. The heat allows the film to stretch without the extreme force that would be needed at room temperature. This controlled stretching is what allows for a smooth, wrinkle-free application on even the most difficult parts of a car.
The Delicate Balance: How Much Heat is Too Much?
This process is a delicate balancing act. The installer must apply just enough heat to make the film pliable. If they apply too little heat, the film will resist stretching, and they might have to pull too hard, which can distort the adhesive. If they apply too much heat, they risk overheating and damaging the film. A master installer develops a feel for this process. They know exactly how much heat a particular film needs and how far it can be safely stretched.
The Tools for Heat Activation
While the technique is paramount, the installer must also have the right tools for the job. Using improper or low-quality equipment for heat application is a common mistake that can lead to poor results and even damage. A professional toolkit will contain specific, high-quality tools for this purpose.
The Professional Heat Gun: The Most Important Tool
The primary tool for heat activation is a professional-grade heat gun. This is not the same as a simple hair dryer. A quality heat gun offers a much wider range of temperatures and more precise control. A professional will look for a model with a digital display and variable temperature settings. This allows them to dial in the exact temperature required for a specific task. They will also have a variety of nozzles for the heat gun to help focus or spread the airflow.
Infrared Thermometers for Precise Temperature Control
To take the guesswork out of the process, many top-tier installers use a handheld, non-contact infrared thermometer. After heating a section of the film, they can instantly read its surface temperature with the thermometer. This ensures that they are working within the optimal temperature range recommended by the film manufacturer. It turns a process that was once based on "feel" into a more scientific and repeatable technique.
Steamers as an Alternative Heat Source
In some specific situations, an installer might use a steamer as an alternative to a heat gun. A steamer provides a gentler, more diffuse, and moist heat. This can be useful for relaxing the film over a large area or for certain finishing techniques. However, for the primary task of stretching and conforming the film, the focused power of a heat gun is generally preferred.
Why a Hair Dryer is Insufficient
A common question is whether a simple hair dryer can be used. The answer is no. A hair dryer does not get hot enough to effectively soften the TPU material. It also lacks the precise temperature control of a heat gun. Attempting to use a hair dryer will be a frustrating and ineffective experience. It is one of several reasons why having the right tools for ppf installation is so crucial.
Application 2: Using Heat for "Post-Heating" and Sealing Edges
The use of heat is not finished once the main surfaces of the film are applied. A critical final step in the installation process is "post-heating." This involves using heat to secure the edges of the film and to ensure the adhesive has formed its maximum bond. Skipping this step is a common error that can lead to premature failure.
What is Post-Heating?
Post-heating is the process of applying a controlled amount of heat to the edges and any stretched areas of the film after it has been fully squeegeed. The goal is to raise the temperature of the film and the adhesive to a specific level for a short period. This has several important effects on the final bond and stability of the installation.
The Role of Heat in Activating the Adhesive's Final Bond
The pressure-sensitive adhesives used in PPF are designed to build their bond over time. This process can be accelerated with heat. The post-heating step essentially "bakes" the film onto the surface. It helps to evaporate any microscopic water molecules that may still be trapped in the adhesive. This encourages the adhesive to flow out and achieve its maximum contact with the clear coat, resulting in a stronger and more durable bond.
Sealing Wrapped Edges to Prevent Lifting
Post-heating is most critical on the edges of the film, especially where it has been wrapped around a panel. These edges are the most vulnerable points of an installation. By heating these edges, the installer is relieving any tension that may be left in the stretched film. It also ensures the adhesive along that edge is fully cured. This process dramatically reduces the risk of the edges lifting or peeling back over time.
The Critical Importance of this Final Installation Step
A less experienced installer might skip or rush the post-heating process because the installation already "looks" finished. This is a major mistake. A proper post-heating routine is a form of quality assurance. It is what turns a good installation into a great one that will stand the test of time. It is a critical step for ensuring the long-term durability of both a full vs partial ppf coverage installation.
Application 3: Using Heat to Activate Self-Healing Properties
The third major application of heat is not part of the installation process itself, but part of the film's long-term maintenance and performance. Most high-quality TPU films have a self-healing top coat. Heat is the catalyst that activates this remarkable property, allowing the film to repair minor scratches and maintain its flawless appearance.
The Science of the Elastomeric Top Coat
The self-healing layer is an elastomeric polymer. This means it has a flexible, cross-linked molecular structure with a form of "memory." When it is lightly scratched, the polymer chains are pushed apart but not broken. The material has a natural tendency to return to its original, smooth state.
How Heat Repairs Minor Scratches and Swirls
Applying heat provides the energy needed for the polymer chains to move and realign themselves. The added thermal energy allows the displaced molecules to flow back into the groove created by the scratch. This fills in the scratch and restores the perfectly smooth surface. The scratch is not filled; it is truly healed at a molecular level.
Passive Healing (Sunlight) vs. Active Healing (Heat Gun)
This healing can happen in two ways. "Passive healing" occurs naturally when the vehicle is parked in the sun. The sun's radiant heat is often enough to erase the fine swirl marks from washing. "Active healing" is when the owner or a detailer uses a heat source to fix a specific scratch. A heat gun (used carefully) or warm water can be used to trigger the healing process on demand.
Safe Temperatures and Techniques for Healing
For active healing, it is important to use a safe amount of heat. The goal is to warm the surface, not to make it scorching hot. A surface temperature of around 60 degrees Celsius (140 Fahrenheit) is usually ideal. When using a heat gun, it should be kept several inches away from the surface and in constant motion to avoid concentrating the heat in one spot. This smart use of heat is what keeps the film looking its best for years.
The Risks and Mistakes of Improper Heat Application
While heat is an essential tool, it is also a dangerous one in inexperienced hands. Improper heat application is the source of many of the most severe PPF installation mistakes. The line between a successful heat activation and a catastrophic failure is very fine.
Here are some of the most common heat-related errors:
- Overheating the Film: Applying too much heat can instantly melt, burn, or warp the film, ruining the panel.
- Uneven Heating: Heating one part of a stretch more than another can lead to an inconsistent finish.
- Overstretching with Heat: Using heat to stretch the film beyond its natural limits will cause it to fail prematurely.
- Forgetting to Post-Heat: Skipping the final step of sealing the edges is a major cause of installation failure.
Mistake 1: Overheating and Melting the Film
This is the most obvious and destructive mistake. If a heat gun is held too close or for too long in one spot, the TPU will exceed its melting temperature. It will lose its texture, turn glossy, and may even burn a hole right through. This damage is irreversible. The entire panel must be removed and redone. This is a costly and entirely preventable error that is common among beginners.
Mistake 2: Uneven Heating and Creating Shiny Spots (on matte film)
On a matte or satin finish film, the application of heat must be perfectly even. If one area is heated more than another, it can alter the microscopic texture of the top coat. This can create a "shiny" spot or a patch where the sheen level is inconsistent with the rest of the panel. This is a very difficult flaw to correct and ruins the uniform, non-reflective look.
Mistake 3: Overstretching with Heat and Distorting the Film
Heat makes the film easy to stretch, but it does not make it infinitely stretchable. A common mistake is to rely too heavily on heat to force the film to fit a shape it is not designed for. This overstretching thins the film, distorts the color, and puts the material under immense tension. The film will almost certainly begin to pull back from the edges in these overstretched areas within a few weeks or months. This is a leading cause of premature lifting and failure. For a deeper look at this and other issues, see our guide to common installation mistakes of color ppf.
Heat Activation in a DIY Context
The complex and delicate nature of heat application is one of the biggest reasons why a do-it-yourself installation is so strongly discouraged. This is not a skill that can be learned quickly. It requires a tactile feel for the material that can only be developed through hands-on practice on hundreds of panels.
Why This is One of the Hardest Skills for a DIYer
A DIY enthusiast does not have the benefit of experience. They do not know how a particular film will react to heat.They do not have the muscle memory for how far it can be stretched. The risk of ruining a panel with the heat gun is extremely high. This is a major hurdle in any diy color tpu ppf installation.
The High Risk of Causing Irreversible Damage
Unlike leaving a water bubble behind, which might cure on its own, a heat-related mistake is often irreversible. A burnt or melted spot is a permanent flaw. An overstretched area will lead to guaranteed failure. These are not small imperfections; they are major disasters that require starting over. This is a key reason why it is almost always better to hire a pro for color ppf. They have the skills to avoid these mistakes.
The Lack of Proper Tools for Temperature Control
A typical DIYer will not have a professional heat gun with a digital temperature display. They certainly will not have an infrared thermometer to check the surface temperature. This means they are working blind, guessing at the correct amount of heat. This lack of precise control makes it much more likely that they will either under-heat or overheat the film. This is why knowing where to buy ppf kits is only part of the battle; having the right professional tools is another. Understanding the true color ppf installation cost means factoring in the value of this expertise.
Final Thoughts
The technique of heat activation for TPU PPF is a perfect example of the high level of skill involved in a professional installation. Heat is an essential and powerful tool. It allows an installer to beautifully conform the film to the most complex vehicle shapes. However, in inexperienced hands, it is also a tool of destruction. The art of applying the perfect amount of heat is a skill that takes years to master. It is a clear and compelling reason why a paint protection film installation is a job best left to the trained and experienced professionals.


