
Popular Articles
Midnight Purple Paint for GTR R34
2026.01.13
Exploring the Allure of Midnight Purple
2026.01.13
Benefits of Using Carbon Fiber Vinyl Wraps
2026.01.13
About Company
Colorfuul is a global leader in high-end automotive films, offering Color TPU PPF, Transparent PPF, PET Window Films, and Vinyl Wrapping. With exports to over 100 countries, we deliver consistent quality, competitive pricing, and professional service. Beyond production, we provide OEM/ODM customization, shaping the future of automotive aesthetics.
 mary@colorfuul.com
  86 13541196952
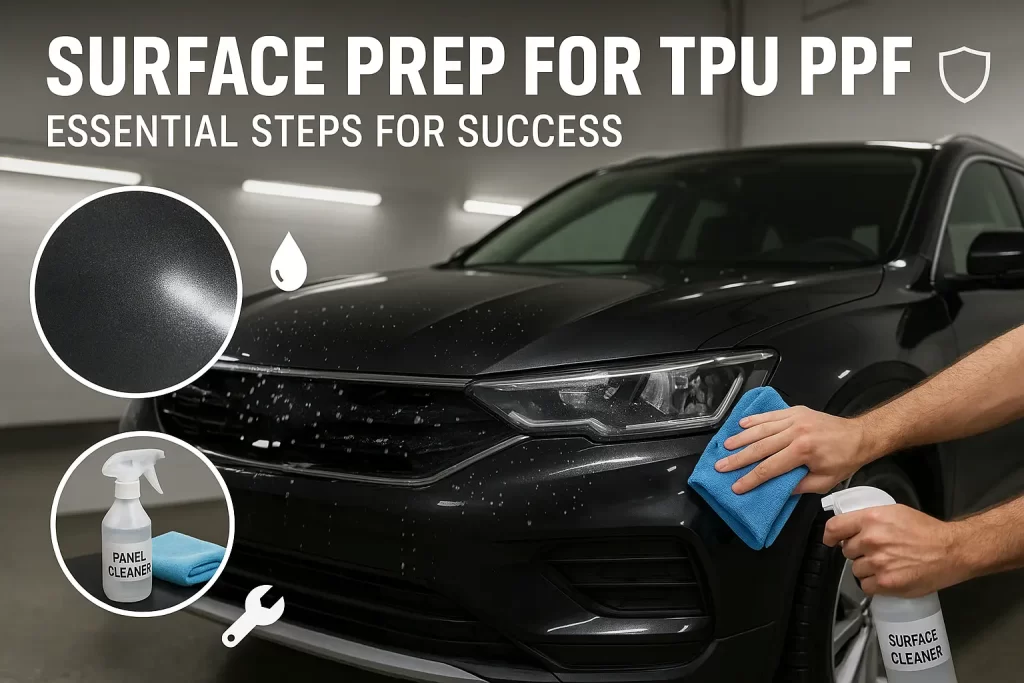
 Surface Prep for TPU PPF: Essential Steps for Success
Proper surface prep for TPU PPF is the absolute foundation of a flawless installation. It is the most critical, time-consuming, and skill-intensive phase of the entire process. While the application of the film is the part that gets the most attention, a master installer knows that the final result is determined long before the film is unrolled. An inadequately prepared surface will guarantee a failed installation. Every single imperfection, from a microscopic speck of dust to a faint swirl mark in the paint, will be trapped and often magnified under the film. This guide provides a detailed exploration of the essential steps for perfect surface preparation, revealing the professional techniques that lead to success.
The Philosophy of Surface Prep: Why It's So Critical
To truly appreciate the importance of surface preparation, one must understand its core philosophy. The goal is to create a surface that is as close to perfectly clean and smooth as is physically possible. The paint protection film's adhesive is designed to bond directly with a vehicle's clear coat. Anything that gets between these two surfaces will compromise that bond and create a visible flaw. The film is a lens that magnifies the condition of the surface beneath it; it does not hide imperfections.
Creating the Perfect Canvas for Adhesion
The primary goal of surface prep is to create the ideal surface for the film's adhesive. The adhesive needs a clean, smooth, and contaminant-free clear coat to form a strong and lasting bond. If the surface has remnants of wax, sealant, or oils, the adhesive will not stick properly. This can lead to lifting edges, bubbles, and premature failure of the installation. A perfectly prepared surface ensures that the film adheres uniformly and securely across every inch of the panel.
The Film Magnifies, It Doesn't Hide
This is a crucial concept that many people misunderstand. A clear, high-gloss paint protection film acts like a magnifying glass for the surface it is applied to. It will not hide swirl marks, scratches, or water spots in the paint. In fact, it will make them more noticeable. The light reflecting through the film will highlight these imperfections. This is why paint correction is a non-negotiable step. The paint must be perfected before it is protected. For a general overview of protective films, the Paint protection film page offers useful context.
Preventing Contamination and Installation Failure
The most common reason for a failed PPF installation is contamination. A single speck of dust, a stray hair, or a tiny grain of sand that gets trapped under the film becomes a permanent and highly visible flaw. It will create a small tent or bubble in the film that cannot be removed. Meticulous surface preparation, combined with a clean installation environment, is all about minimizing the risk of this type of contamination. It is a battle for surgical cleanliness.
Here are the key goals of a professional surface preparation process:
- To Remove All Loose Contaminants: This includes dirt, dust, and grime that are on the surface of the paint.
- To Remove All Bonded Contaminants: This includes industrial fallout, iron particles, tar, and tree sap that have bonded to the clear coat.
- To Perfect the Paint Surface: This involves machine polishing to remove all scratches, swirl marks, and other imperfections in the clear coat.
- To Create a Chemically Clean Surface: The final step is to remove all polishing oils and residues, leaving a perfectly bare and clean clear coat for the film to adhere to.
Stage 1: The Decontamination Wash
The first stage of surface prep is a wash that is far more thorough than a typical car wash. The goal of this decontamination wash is to remove all loose dirt and grime from the vehicle. This includes cleaning not just the main surfaces, but all the panel gaps, trim pieces, and crevices where dirt can hide.
The Two-Bucket Wash Method Explained
A professional will always use the two-bucket wash method. One bucket contains the car wash soap solution. The second bucket contains plain rinse water. A soft, clean microfiber wash mitt is used. The mitt is dipped in the soap bucket, a small section of the car is washed, and then the mitt is rinsed thoroughly in the rinse water bucket before being put back into the soap. This process prevents the dirt that is removed from the car from contaminating the soap bucket. This dramatically reduces the risk of inflicting new scratches during the wash process.
Choosing the Right pH-Neutral Car Soap
The type of soap used is also important. A strong, high-pH soap or degreaser can strip away any existing waxes or sealants, but it can also be harsh on plastic trim and rubber seals. A professional will typically use a high-quality, pH-neutral car wash soap. This is effective at cleaning the surface without being overly aggressive. It is also important to use a soap that does not contain any added waxes or gloss enhancers, as these can leave behind a residue that interferes with the film's adhesion.
Cleaning Panel Gaps, Emblems, and Trim
This is where a professional wash differs from a standard one. An installer will use a variety of soft-bristled brushes and detailing tools to clean all the areas that a wash mitt cannot reach. They will carefully clean out the gaps between body panels. Dirt hiding in these crevices can easily become dislodged during the film installation and slide under the film.
The Importance of a Pressure Washer for Rinsing
After washing and detailing, the vehicle must be rinsed thoroughly. A pressure washer is the best tool for this job. It provides a strong stream of water that can effectively flush out all the soap and dislodged dirt from the panel gaps and tight areas. A professional will be careful with the pressure washer, keeping it at a safe distance from the paint to avoid causing any damage. A final, slow rinse with deionized water can help the car to dry without leaving water spots.
Stage 2: Chemical Decontamination
Even after a thorough wash, the paint surface is not truly clean. It is still covered in bonded contaminants. These are tiny particles that have physically or chemically bonded to the clear coat and cannot be removed by washing alone. The next stage of preparation is to use specific chemicals to dissolve these contaminants.
What Are Bonded Contaminants?
There are two main types of bonded contaminants. The first is iron fallout. These are tiny particles of iron that come from brake dust and industrial sources. They embed themselves in the clear coat and can cause tiny rust spots. The second type is organic contaminants. This includes things like road tar, tree sap, and bug splatter that have dried and hardened onto the surface. Both types make the paint feel rough to the touch.
The Role of an Iron Remover
To remove the iron fallout, a special chemical called an iron remover is used. This is a pH-neutral formula that is sprayed onto the vehicle's surface. The chemical reacts with the embedded iron particles. As it works, it dissolves the iron, and the chemical's color changes, usually to a deep purple or red. This is often called the "bleeding" effect. It is a visual confirmation that the product is working. After a few minutes, the chemical is thoroughly rinsed away.
Using a Tar and Adhesive Remover Safely
To remove the organic contaminants, a tar and adhesive remover is used. This is a solvent-based product that can dissolve stubborn tar spots and tree sap. An installer will apply this product to a microfiber towel and gently wipe the affected areas. It is important to use a product that is rated as safe for automotive clear coats. After the tar is removed, the panel is often washed again to remove any oily residue from the solvent.
The Final Rinse and Dry After Chemical Treatment
After both the iron and tar removal steps, the entire vehicle must be thoroughly rinsed once more. This ensures that all the chemicals have been completely removed from the surface. The vehicle is then carefully dried using a combination of a high-powered air blower and soft, plush microfiber drying towels. The air blower is used to force water out of all the panel gaps, mirror housings, and trim pieces.
Stage 3: Mechanical Decontamination with a Clay Bar
Even after chemical decontamination, the paint may still have some fine, embedded particles remaining. The final step in the cleaning process is mechanical decontamination using a detailing clay bar. This process physically shears off any remaining contaminants, leaving the paint surface perfectly smooth.
What a Clay Bar Does that Washing Cannot
A clay bar is a special, putty-like material. When it is glided across a lubricated paint surface, it gently abrades and pulls out any contaminants that are protruding from the clear coat. This includes things like paint overspray, stubborn industrial fallout, and other fine grit. This is a level of cleaning that washing and chemical treatments alone cannot achieve. It is the only way to get the surface to be as smooth as glass.
Choosing the Right Grade of Clay Bar
Detailing clay comes in different grades of aggressiveness, usually fine, medium, and heavy. For a new or well-maintained vehicle, a fine-grade clay bar is almost always the correct choice. It is gentle on the paint and will not cause marring. A medium or heavy-grade clay should only be used by a professional on a highly contaminated vehicle, as it can inflict fine scratches that will then need to be polished out.
The Proper Technique for Using a Clay Bar
The key to using a clay bar safely is lubrication. The surface must be constantly lubricated with a special clay lube spray or a quick detailer. This allows the clay to glide smoothly over the paint. The clay is formed into a small patty. It is then moved back and forth over a small section with very light pressure. After each section, the clay is folded and kneaded to expose a fresh, clean surface. This prevents the contaminants that have been picked up from scratching the paint.
The "Baggy Test" to Check for Smoothness
The best way to feel the effectiveness of a clay bar is with the "baggy test." Before claying, you can place your hand inside a thin plastic sandwich bag and gently feel the paint. The bag will amplify the texture, and you will feel the gritty, rough contaminants. After claying a section, you can perform the test again. You will feel a dramatic difference. The surface will be perfectly smooth. The process is repeated across the entire vehicle until every panel passes the baggy test.
Stage 4: Paint Correction and Polishing
With the surface now perfectly clean, the next stage is to perfect the paint itself. This is the paint correction stage. The goal is to remove any and all imperfections from the clear coat, such as swirl marks, scratches, and water spots. This is almost always done with a machine polisher. This stage is critical for achieving a flawless final look.
Why Even Brand-New Cars Need Paint Correction
This is a point that surprises many people. A brand-new car, straight from the dealership, will almost always have a flawed paint finish. The car has been transported, stored, and then washed improperly by the dealership staff. This process almost always inflicts a network of fine swirl marks and light scratches. These must be removed before the PPF is applied. The idea of polishing a brand-new car is standard procedure in the world of high-end detailing and PPF installation.
Inspecting the Paint with High-Powered Lighting
To perform a proper paint correction, the installer must be able to see all the flaws. This requires special, high-powered inspection lights. They will use a combination of handheld LED lights and large stand-mounted lights. These lights are designed to mimic direct sunlight and reveal every tiny scratch and swirl mark. The installer will use these lights to create a detailed map of the paint's condition.
The Process of Compounding to Remove Deeper Scratches
If the vehicle has any deeper scratches, the installer will start with a process called compounding. This involves using a machine polisher with a more aggressive cutting pad and a liquid abrasive compound. The compound's tiny abrasives cut away a very small amount of the clear coat, leveling the surface and removing the scratch. This is a highly skilled process that requires great care to avoid removing too much clear coat.
The Process of Polishing to Refine the Finish
After any compounding is done, the entire vehicle is polished. Polishing is a less aggressive process. It uses a finer liquid polish and a softer foam pad. The goal of polishing is to remove the very fine swirl marks and to refine the finish to a high gloss. The installer will work in small sections, moving the polisher slowly and deliberately across the paint. This is the step that creates the deep, wet-looking, mirror-like shine.
Ensuring a Swirl-Free, Mirror-Like Surface
A top-tier paint correction can take many hours or even days to complete. The installer will constantly check their work with their inspection lights to ensure that every last swirl mark has been removed. The goal is to create a surface that is as close to optically perfect as possible. This flawless, mirror-like canvas is the necessary foundation for a perfect PPF installation.
Stage 5: The Final Cleaning and Inspection
With the paint now perfectly clean and perfectly polished, there is one final preparation stage. This is the final wipe-down to remove any oils or residues from the polishing process. This step ensures that the surface is in its final, ready state for the film.
The Isopropyl Alcohol (IPA) Wipe-Down
The liquid polishes used in the paint correction stage contain oils and other lubricating agents. These oils can interfere with the PPF adhesive. To remove them, the installer performs a final wipe-down with an isopropyl alcohol (IPA) solution. This is typically a mixture of IPA and deionized water. A clean, soft microfiber towel is used to gently wipe down every panel. This solvent wipe removes all the polishing residues and leaves behind a perfectly bare and sterile clear coat.
The Final Inspection Under Multiple Light Sources
After the IPA wipe-down, the installer will perform one last, final inspection of the entire vehicle. They will use their high-powered lights to check every panel from multiple angles. They are looking for any remaining polishing residue, any missed spots, or any last-minute contamination. This is the final quality control check of the preparation phase.
Using Compressed Air to Clear Gaps and Crevices
Just before applying the film to a specific panel, the installer will often use a compressed air blower. They will use it to blow out all the panel gaps, seals, and trim pieces one last time. This ensures that no hidden dust or water from the preparation process can come out and contaminate the installation.
The Point of No Return: The Surface is Ready
At this point, the surface prep for TPU PPF is complete. The vehicle is as clean and perfect as it can possibly be. It is now ready to be moved into the main installation area. This entire, multi-day process of preparation is what enables a professional to deliver the flawless, long-lasting results that their clients expect. It is a testament to the fact that in the world of PPF, preparation is not just a step in the process; it is the process.
The DIY vs. Professional Reality of Surface Prep
Understanding this intensive process makes it clear why surface preparation is such a massive hurdle for a DIY enthusiast. A professional shop has the dedicated space, specialized tools, and most importantly, the skill and experience to perform these steps correctly.
The Tools and Chemicals Required
The list of required supplies for a proper surface prep is long and expensive. It includes multiple buckets, wash mitts, a pressure washer, an air blower, a clay bar, an iron remover, a machine polisher with multiple pads and liquids, high-powered lights, and a large supply of clean microfiber towels. Acquiring all these high-quality tools for a color ppf installation is a significant investment.
Why This Stage is a Major Hurdle for a DIY Installation
Most DIY enthusiasts simply do not have the experience to perform a professional-level paint correction. Using a machine polisher without proper training is very risky and can easily damage the paint. The entire process is incredibly time-consuming and physically demanding. It is a professional trade in its own right. Attempting to do this at home is one of the main reasons why a diy color tpu ppf installation is so likely to fail.
The Value of a Professional Detailer's Expertise
A PPF installer is also a master detailer. The skills are inseparable. The value of hiring a professional is not just in their ability to apply the film, but also in their ability to execute this flawless preparation. They have the expertise to make your car's paint look better than it did the day it left the factory. For anyone considering this work, the best advice is always to hire a pro for color ppf. They will handle every aspect of the prep and installation, avoiding the common installation mistakes of color ppf. It understands the nuances of a full vs partial ppf coverage and the techniques for heat activation of tpu ppf. They can also help you buy the right ppf kits and understand the local color ppf installation cost. Their work will ensure you never have to worry about how to remove bubbles from color ppf.
Final Thoughts
In conclusion, a meticulous, multi-stage surface prep for TPU PPF is the undeniable secret to a successful installation. It is a process that is far more complex than a simple wash and wax. It involves deep cleaning, chemical and mechanical decontamination, and professional-level paint correction. Every step is designed to create a perfectly clean and smooth canvas. It is this flawless foundation that allows the paint protection film to bond properly, look its best, and last for its full lifespan. While the process is daunting, it is a testament to the level of craftsmanship and attention to detail that goes into a truly professional PPF application.


