
Popular Articles
Midnight Purple Paint for GTR R34
2026.01.13
Exploring the Allure of Midnight Purple
2026.01.13
Benefits of Using Carbon Fiber Vinyl Wraps
2026.01.13
About Company
Colorfuul is a global leader in high-end automotive films, offering Color TPU PPF, Transparent PPF, PET Window Films, and Vinyl Wrapping. With exports to over 100 countries, we deliver consistent quality, competitive pricing, and professional service. Beyond production, we provide OEM/ODM customization, shaping the future of automotive aesthetics.
 mary@colorfuul.com
  86 13541196952
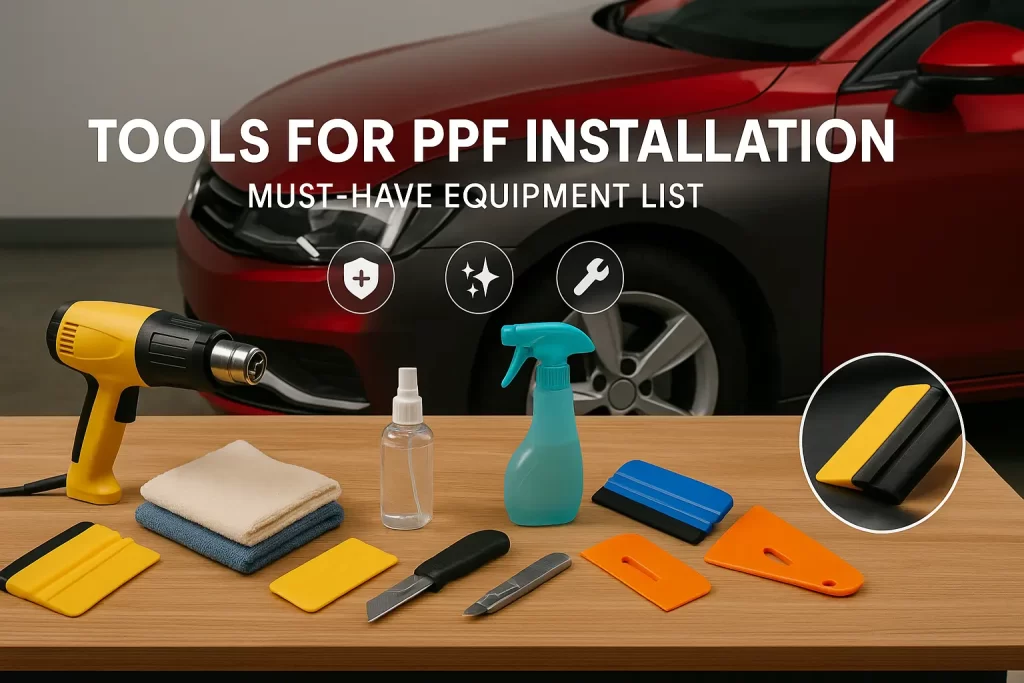
 Tools for PPF Installation: The Must-Have Equipment List
Having the right tools for PPF installation is absolutely essential for achieving a professional, flawless result. While the skill and experience of the installer are paramount, that skill cannot be fully expressed without a comprehensive arsenal of specialized equipment. Paint protection film installation is a craft of precision, and every tool has a specific purpose, from the initial surface preparation to the final, microscopic details. This guide will provide an exhaustive list and a deep dive into the must-have equipment for a PPF installation. It will explore what each tool does, why it is important, and what separates a professional's toolkit from an amateur's.
The Foundation: Tools for the Installation Environment
The first set of tools is not for touching the car, but for creating the perfect environment in which to work. A professional installation is impossible in a dusty, poorly lit, or uncontrolled space. The environment itself is the first and most fundamental tool in the entire process.
High-Lumen, Color-Accurate Lighting
Lighting is the single most important environmental tool. An installer must be able to see every single speck of dust, every faint swirl mark in the paint, and every tiny bubble under the film. This requires a multi-layered lighting setup. A professional bay will have bright, overhead ambient lighting, often using high-CRI (Color Rendering Index) bulbs to show colors accurately. This is supplemented by powerful, portable stand-mounted lights and handheld inspection lights. These can be positioned at low angles to reveal surface imperfections that would be invisible under normal lighting.
Climate Control: Heaters and Dehumidifiers
The behavior of the PPF material and the application solutions is highly dependent on temperature and humidity. An installation bay must be climate-controlled. The ideal temperature is typically a stable, comfortable room temperature. If it is too cold, the film will be stiff and less pliable. If it is too hot, the slip solution can evaporate too quickly. A consistent, controlled temperature ensures that the film behaves predictably, which is crucial for achieving consistent results.
Dust Control: Air Filtration Systems and Floor Coatings
Dust is the number one enemy of a PPF installer. A professional shop invests heavily in dust control. This often includes an air filtration system that constantly scrubs the air to remove airborne particles. The floors are typically coated with a special epoxy. This prevents the concrete from generating dust and makes the floor easy to clean. An installer will also meticulously clean the bay before every job. This obsession with cleanliness is a hallmark of a professional. For a general overview of protective films, the Paint protection film page offers useful context.
Vehicle Lifts or Scaffolding for Ergonomics
Working on the lower sections of a vehicle, such as the rocker panels and lower bumpers, can be physically demanding. A professional shop will often use a vehicle lift to raise the car to a comfortable working height. This improves the installer's ergonomics, reducing fatigue and allowing them to produce higher-quality work with better precision. For shops without a lift, low-rise scaffolding or comfortable rolling stools are used.
Phase 1: Tools for Decontamination and Washing
The first hands-on phase is the deep cleaning and decontamination of the vehicle. This requires more than just a bucket and sponge. A specific set of tools is needed to ensure the vehicle is surgically clean before the main preparation work begins.
Pressure Washer with Proper Nozzles
A pressure washer is an essential tool for an effective pre-wash and rinse. It provides the power needed to blast away loose dirt and to thoroughly flush out panel gaps and crevices. A professional will use a pressure washer with a range of different fan-pattern nozzles. A wider-angle nozzle is used for rinsing the main body panels safely. A more focused nozzle might be used for cleaning wheel wells.
Foam Cannon for Pre-Soaking
Before touching the car with a wash mitt, an installer will use a foam cannon. This is an attachment for the pressure washer that mixes car soap with water and air to create a thick, clinging foam. The vehicle is covered in this foam and allowed to dwell for several minutes. The foam softens and encapsulates the dirt and grit on the surface. This allows much of the dirt to be rinsed away before a mitt ever touches the paint, dramatically reducing the risk of swirl marks.
The Two-Bucket System with Grit Guards
The two-bucket wash method is a cornerstone of safe washing. It involves one bucket for the soap solution and one for rinsing the wash mitt. A professional setup will also include "Grit Guards" at the bottom of each bucket. These are plastic grates that trap the dirt and grit at the bottom of the bucket, preventing it from getting back into the wash mitt and scratching the paint.
High-Quality Microfiber Wash Mitts and Towels
The quality of the microfiber used is paramount. An installer will use plush, soft, and clean microfiber wash mitts. For drying, they will use large, high-GSM (grams per square meter) microfiber drying towels that can absorb a huge amount of water. They will also have a large collection of general-purpose microfiber towels for various cleaning and wiping tasks. These towels are meticulously cared for and washed separately to maintain their softness and cleanliness.
Detailing Brushes for Gaps and Emblems
To clean the tight areas where a wash mitt cannot reach, a set of soft detailing brushes is used. These come in various sizes. They are used with the car soap solution to gently agitate and clean around emblems, grilles, and in the gaps between body panels. This ensures that no hidden dirt can become dislodged during the film installation.
Phase 2: Tools for Decontamination and Paint Correction
After the wash, the surface preparation continues with more specialized tools designed to perfect the paint finish. This is the stage that turns a clean car into a flawless canvas. The importance of this stage is detailed in our guide to surface prep for ppf.
Clay Bars and Lubricants
A detailing clay bar is used to physically remove bonded contaminants from the paint. An installer will have a selection of different grades of clay, from fine to medium. They will also use a high-quality clay lubricant. This is a very slick liquid that is sprayed onto the surface to allow the clay to glide without marring the paint.
Chemical Decontamination Sprays
In addition to mechanical decontamination with clay, chemical decontamination is also performed. This requires specific chemical sprays. An iron remover is used to dissolve embedded ferrous particles from brake dust. A tar and adhesive remover is used to safely break down any tar spots or tree sap.
Machine Polishers (Dual Action vs. Rotary)
A machine polisher is a mandatory tool for achieving a flawless, swirl-free finish. There are two main types. A dual-action (DA) polisher is the safer and more common choice. Its head oscillates in a random orbit, which makes it very effective at removing swirl marks without generating too much heat or risk. A rotary polisher is a more powerful tool used by experts for removing deeper scratches. It requires a very high level of skill to use safely.
A System of Compounds, Polishes, and Pads
A machine polisher is useless without a system of liquids and pads. An installer will have a full range of products, from heavy-cutting compounds for deep scratches to fine polishes for a mirror-like finish. They will also have a large collection of foam and microfiber pads of different sizes and "cutting" abilities. Knowing which combination of pad and polish to use on a specific paint type is a key skill.
High-Powered Inspection Lights
As mentioned in the environment section, handheld inspection lights are a critical tool during the paint correction phase. An installer will constantly use a powerful LED light to check their work. The light reveals any remaining swirl marks and shows the true condition of the paint. It is impossible to achieve a perfect paint correction without a high-quality inspection light.
Phase 3: Tools for Film Handling and Application
This is the core toolset that is used for the actual application of the paint protection film. These are the tools that are in the installer's hands for most of the job. The quality and variety of these hand tools are a sign of a true professional.
Spray Bottles for Application Solutions
An installer will have several high-quality, chemical-resistant spray bottles. They will be clearly labeled for the different solutions used. This includes a "slip solution" (water and soap/gel) and a "tack solution" (water and alcohol). Having multiple, reliable spray bottles is essential for a smooth workflow.
The Squeegee Arsenal: A Deep Dive
The squeegee is arguably the most important hand tool. An installer will not have just one squeegee; they will have an entire arsenal of them. They come in many different shapes, sizes, and levels of hardness (durometer). A large, soft squeegee might be used for the initial, main strokes on a large panel. A smaller, harder squeegee might be used for forcing water out of a tight area. There are specialized squeegees for reaching into corners and others for wrapping edges. A professional will have dozens of them and will instinctively know which one to use for each specific task.
The Knife: The Installer's Most Important Tool
For bulk installations, the knife is a direct extension of the installer's hand. Professionals almost exclusively use snap-off blade knives. They will use a new, fresh blade for almost every cut to ensure it is perfectly sharp. A dull blade can snag or tear the film. There are also specialized knives with different blade angles for specific types of trimming. The skill of trimming a perfect, straight edge by hand is one of the most difficult techniques to master.
Heat Gun with Variable Temperature Control
A heat gun is an essential tool for manipulating the film. It is used to make the material more pliable for stretching over complex curves. It is also used to help "post-heat" and secure the edges of the film. A professional will use a high-quality heat gun with a digital, variable temperature control. This allows them to apply the precise amount of heat needed without risking damage to the film or the paint. Understanding heat activation for tpu ppf is a critical skill.
Installation Gel and Slip Solution Concentrates
While a simple baby shampoo can be used to make a slip solution, professionals use specialized concentrates. They will have a bottle of installation gel or a slip solution concentrate that is specifically formulated for PPF. These products provide a more consistent and longer-lasting slip, which is crucial when working on large or complex panels.
Phase 4: Tools for Finishing and Trimming
The final stage of the installation involves the meticulous finishing work. This is where the details are perfected, and the installation is given its seamless, paint-like appearance. This requires another set of specialized tools.
Specialized Tuck Tools for Edges and Seals
To tuck the edges of the film into tight panel gaps or under rubber seals, an installer uses a set of non-marring plastic tuck tools. These come in a variety of shapes and sizes. They are made from a relatively soft plastic that will not scratch the paint or tear the film. These tools allow an installer to hide the film's edges for a truly invisible installation.
Tweezers for Removing Contaminants
Even in the cleanest environment, a tiny speck of dust or a stray lint fiber can sometimes get trapped under the film. A skilled installer can often fix this if it is caught quickly. They will use a pair of very fine-tipped, sharp tweezers. They will carefully lift a corner of the film, use the tweezers to remove the tiny contaminant, and then re-apply the area.
Measuring Tapes and Rulers for Bulk Installations
For a bulk installation, where each panel is cut by hand from a large roll, measuring tools are essential. An installer will use a soft, flexible measuring tape to get the rough dimensions of each panel. They will also use long, straight-edge rulers to make their primary cuts on the cutting table.
Lint-Free Wipes for Final Clean-Up
After the installation is complete and the film has cured, the installer will perform a final clean-up. They will use a high-quality detail spray and special, lint-free wipes to clean the surface of the film. This removes any streaks or smudges from the installation process and leaves the vehicle with a perfect, delivery-ready shine.
Advanced Tools and Technology
Beyond the hand tools, a modern, high-end PPF shop will also have a range of advanced technology and large equipment. This is what separates a state-of-the-art facility from a standard workshop.
Computer and Plotter for Pre-Cut Kits
Many shops now use pre-cut kits for their installations. This involves using a computer with special software that has a database of patterns for thousands of vehicles. The installer selects the make and model of the car, and the software sends the patterns to a large machine called a plotter. The plotter has a very fine blade, and it automatically cuts the film into the precise shapes of the vehicle's body panels. This is a great way to ensure a perfect fit and to avoid the risk of cutting the vehicle's paint.
Film Handling and Cutting Tables
Whether using a plotter or cutting by hand, a professional needs a large, clean space to handle the film. They will have a dedicated film cutting and preparation table. This table is often backlit to make it easier to see the film and to spot any imperfections.
Deionized Water Systems for Spot-Free Rinsing
During the washing and preparation stages, a shop will often use a deionized water system for the final rinse. This system filters out all the minerals and dissolved solids from the tap water. Using pure, deionized water ensures that when the car is dried, there are absolutely no water spots left behind. This is another example of the meticulous attention to detail in a professional process.
The DIY vs. Professional Tool Kit
The sheer length and expense of this list of tools should make one thing clear: a professional toolkit is a massive investment. A beginner attempting a DIY project will have a very limited and inadequate set of tools compared to a professional.
The High Cost of Assembling a Professional Kit
To assemble a complete, professional-grade toolkit as described above would cost many thousands of dollars. The machine polisher, the specialized lighting, the plotter, and the vast collection of hand tools all represent a significant capital investment. This is one of the reasons why a professional installation has the price it does. A client is paying for access to this specialized equipment. The full list of equipment highlights why a diy color tpu ppf installation is so challenging.
Why a Beginner's Kit is Insufficient
A basic "installation kit" that can be bought online might contain one squeegee, a knife, and a spray bottle. This is grossly insufficient for a quality installation. Attempting to wrap a car with just these basic tools is like trying to build a house with only a hammer. It is possible to buy ppf kits, but they are not a substitute for a full professional toolset.
How Tools Impact the Final Result
Every tool on this list has a direct impact on the quality of the final result. Good lighting reveals flaws. A quality squeegee prevents bubbles. A sharp knife creates clean edges. Without the right tools, even a skilled person will struggle to produce a good result. The tools are what enable a professional's skill to be translated into a flawless finish. They are a key part of avoiding the common installation mistakes of color ppf. Understanding the cost of these tools is part of understanding the overall color ppf installation cost. This is why it is almost always better to hire a pro for color ppf. They have the tools and the experience to handle any situation, from a full vs partial ppf coverage job to knowing how to remove bubbles from color ppf.
Final Thoughts
The extensive and highly specialized list of tools for PPF installation underscores the fact that this is a professional trade. It is a craft that requires a deep investment in both skill and equipment. From the controlled environment to the vast arsenal of hand tools, each item plays a critical role in achieving a consistent, durable, and visually perfect result. These tools are the instruments that, in the hands of a master, can turn a simple roll of film into a seamless, protective, and beautiful second skin for a vehicle.


